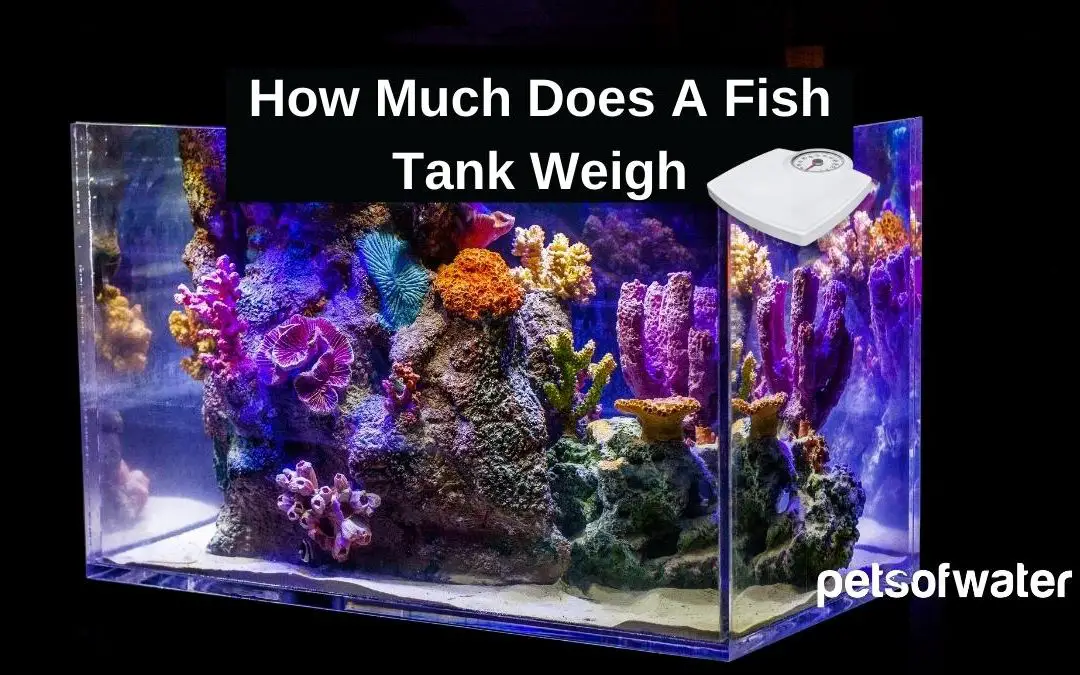
It is important to know how much your fish tank will weigh for a number of reasons. Here are some important questions you should know.
Will your floor support it?
Are you putting the fish tank in a room upstairs?
How much weight can my floor hold?
To get these answers you may need to do some research but in this article, I will save you some time and effort by giving you the weight of various fish tanks by water volume. I don’t want your floor to cave causing you to lose valuable fish lives as well as damage to your home.
Fish tanks do weigh quite a lot but if handled properly your floor and fish tank will sit safely for you to enjoy for years to come.
How Much Does A Fish Tank Weigh
A fish tank’s weight is based on the empty tank weight plus the water volume. Your fish tank manufacturer should have the weight of the actual fish tank, but water weighs 8.3 pounds so if you multiply that by the volume of your tank and add the tank weight you will have the answer.
Below is a table showing water volume and weight to help you better understand how much your fish tank weighs.
Water Volume
Weight
1 Gallon Water Volume
8.3 Pounds Plus Empty Tank Weight
5 Gallon Water Volume
41.5 Pounds Plus Empty Tank Weight
10 Gallon Water Volume
83 Pounds Plus Empty Tank Weight
15 Gallon Water Volume
124.5 Pounds Plus Empty Tank Weight
20 Gallon Water Volume
166 Pounds Plus Empty Tank Weight
25 Gallon Water Volume
207.5 Pounds Plus Empty Tank Weight
Other Weight Factors To Consider
Your aquascape will add to the overall weight of your fish tank. If you are using reef rock such as Marcos Rock it is typically purchased by the pound. Add this purchase weight to your total weight calculation to know how much your fish tank weighs.
If you do not use all of the Marcos Rock then it is best to have a scale to weigh how much used in your aquascape before you add it to the fish tank. To rule of thumb is 1 pound per gallon of water so it may be best to add your total water volume to the weight of the water and your empty tank to come up with the weight of your fish tank.
Will Your Floors Support The Weight
I advise you to consult with a local contractor but the national code states that floors can support a minimum of 30 to 40 pounds per square foot.
The only way to increase that load is by beefing up your floor underneath which may not be possible for everyone. If you have an exposed floor below where your fish tank will be then you can hire someone to add more supports below.
Some people opt to have a metal jack right under the fish tank to ensure that the load can be handled by the floor. As a general rule, it is best to be proactive with this as you don’t want to regret it later. Always consult with a licensed contractor before assuming your floor can handle the weight. Consultations with a contractor are typically free so be sure to call around and find someone to best advise you.
How To Calculate Water Volume Of My Fish Tank
To figure out how many gallons of water are in your fish tank you will measure the length width and height of your fish tank. If your tank is 36 inches in length, 24 inches in depth (front to back), and 20 inches tall you will multiply the length of 36 inches by the width of 24 inches and then take that number and multiply it by the height of 20 inches to get the cubic inches.
36 x 24 = 864
864 x 20 = 17,280
The total cubic inches is 17,280
Now you will divide 17280 by 231 and your total water volume is 74.8 which is 75 gallons rounded up.
Now that you have the water volume you can calculate the weight of this volume.
How To Calculate Water Weight Of A Fish Tank
First, figure out how much your tank volume is in gallons and then multiply that by 8.3 which is the weight of water per gallon.
If you have a 75 gallon water volume you can multiply that by 8.3 which is 622.5 pounds of water in your fish tank.
75 x 8.3 = 622.5
Most Common Fish Tanks And Weight
There are a lot of fish tank manufacturers and I have taken some of the most common fish tank sizes from these manufacturers and listed them below for your convenience.
Before you add water to your fish tank set your empty tank on a scale to get the weight of it to be added to the water weight.
How Much Does A 10 Gallon Fish Tank Weigh
A 10 gallon fish tank with water will be slightly over 83 pounds depending on the aquascape and fish tank empty weight.
How Much Does A 20 Gallon Fish Tank Weigh
A 20 gallon fish tank with water will be slightly over 166 pounds depending on the aquascape and fish tank empty weight.
How Much Does A 29 Gallon Fish Tank Weigh
A 29 gallon fish tank with water will be slightly over 240.7 pounds depending on the aquascape and fish tank empty weight.
How Much Does A 36 Gallon Fish Tank Weigh
A 36 gallon fish tank with water will be slightly over 298.8 pounds depending on the aquascape and fish tank empty weight.
How Much Does A 40 Gallon Fish Tank Weigh
A 40 gallon fish tank with water will be slightly over 332 pounds depending on the aquascape and fish tank empty weight.
How Much Does A 55 Gallon Fish Tank Weigh
A 55 gallon fish tank with water will be slightly over 456.5 pounds depending on the aquascape and fish tank empty weight.
How Much Does A 60 Gallon Fish Tank Weigh
A 60 gallon fish tank with water will be slightly over 498 pounds depending on the aquascape and fish tank empty weight.
How Much Does A 200 Gallon Fish Tank Weigh
A 200 gallon fish tank with water will be slightly over 1660 pounds depending on the aquascape and fish tank empty weight.
Phytoplankton can add an abundance of beneficial nutrients to your reef tank and help keep your livestock happy and healthy.
When we culture our own phytoplankton we know exactly how it was grown and what is in it. That makes it better than store-bought versions in my own opinion as I want to know everything in it.
A lot of companies who sell phytoplankton sell it as a mixture of several different strains which isn’t all that great. I personally want a specific type of phytoplankton strain that will best suit my own needs.
I prefer Nannochloropsis or Tetraselmis phytoplankton as it does best for me culturing and it provides my reef tank with what it needs also. My copepod culture benefits greatly from my own culture. I have tried other store-bought options and it crashed my culture. That really sucks and is a waste of money.
In this article, I am going to teach you how to culture or grow your own phytoplankton so you can use it as you need.
Why Culture Phytoplankton
There are a number of benefits to culturing your own phytoplankton and the main benefit is an unlimited supply of phytoplankton which benefits your wallet and your reef tank. Having phytoplankton available helps keep your phytoplankton dosing schedule consistent.
How To Culture Phytoplankton
Culturing phytoplankton is pretty easy and can seem intimidating but once you get the hang of the process you should be just fine. I have done this for years and if I can do it anyone can. Plus ask anyone who buys my phytoplankton it is some of the best you can get.
What You Will Need To Culture Phytoplankton
There are a number of necessary items to start your culture. Don’t be quick to jump on any kits being sold online. These are meant to save you time yes but they don’t provide the best results. If you want a culture that never crashes and provides the densest phytoplankton possible then follow my lead here and use the tools I use.
Click here to purchase your starter culture of phytoplankton.
Be sure to purchase all the needed equipment below:
Air Pump – This will oxygenate the water as well as keep your culture suspended in the water column and prevent settling. VERY IMPORTANT! I personally run two of the whisper pumps for my larger culture vessel.
Air Line – You have to have this for your air pump to provide air to your culture vessel.
Rigid Air Line Tubing – This is important to keep the tubing in its place not curved.
Culture Sample – You can purchase my starter culture sample of nano and tet phytoplankton. I recommend having both options or culturing both types of phytoplankton.
Marine Salt – To culture phytoplankton for your reef tank you will need marine salt. If you have your own salt that will work but you have to get the salt to 20 ppm in your vessel.
F2 Fertilizer – I like Guillard’s F2 because it is the cleanest and safest option for your reef tank. It is required to actually grow your phytoplankton.
Culture Vessel – Without a culture vessel you will not be able to grow phytoplankton. I recommend starting small and working your way up to a larger vessel like mine.
Isopropyl Alcohol – This is a must also as you want to clean and sanitize your culture vessel every time you use it. This will prevent germs and any other contamination from entering your vessel.
Aluminum Foil Sheets – This will be used to top the phytoplankton vessel. We want to prevent anything from getting out as well as evaporation which will cause problems.
Lighting – This is used to fuel the growth of your phytoplankton and required to culture your own phytoplankton.
I have listed above all of the products that you will need to culture your own phytoplankton. If you use the links I have provided it will take you directly to the products I personally use.
Where To Culture Phytoplankton
Most people who culture their own phytoplankton will use a closet or a shelf in their fish room dedicated to phytoplankton. It is important not to have anything near the culture vessel as it could contaminate it.
If you are doing this in a fish room then simply block the culture from being visible with cardboard or plastic wrap. This will keep any contaminants away from the culture preventing a crash.
I like to use a closet which I have dedicated to culturing phytoplankton and it has worked well for me. The culture stays at room temperature which I feel gives a better result.
How To Culture Phytoplankton Step By Step
I will be updating this post with a video showing my process for culturing and growing phytoplankton. If you need your own starter cultures you can purchase that from me here.
PRO TIP: Before you start your culture be sure to spray your vessel with rubbing alcohol to sterilize it. Do this after each use to ensure no contaminants get in your phytoplankton culture.
Step 1. You Need Saltwater
Fill your culture vessel with saltwater but leave enough room for water movement so that it does not spill out of the phytoplankton culture vessel. Be sure your saltwater salinity is about 20 ppm or 1.015 gravity. If you aren’t 100% on the money with your measurement that will not hurt anything. I try to get as close as I can without making it a huge deal.
Step 2. You Need Air
Attach your airline to your air pump to start pushing air. Be sure to include a check valve and a control valve so that you can control the airflow. If you purchased rigid airline tubing then cut the tubing to about 1 or 2 inches above the top of the vessel. Attach the soft airline tubing to the rigid tubing and turn on the air.
You should see the water move with great flow. If it is too much for your culture vessel then use the control valve to control the airflow into the phytoplankton culture vessel. Turn the controller until it is moving the water and fast but not spilling. It is best to start this process over a sink or somewhere water is ok.
Step 3. You Need Phytoplankton
Now, this is the time to purchase your phytoplankton from me or somewhere else online. I have given several resources on phytoplankton and where to purchase so choose where you want it and when you get it you will pour it in your culture vessel. Hopefully, you are reading this in preparation for culturing your phytoplankton and already have it before you started the first steps.
Step 4. You Need F2 To Grow Phytoplankton
I love the Guilliards F2 formula as it gives me the best culture possible. You want to use 2.5 ML of F2 for every 250 ML. You can double this dose but I start small and work my way up after a few days. I dose about 20ml of F2 in my culture vessel. It is a 1000ml glass container. That is 1ml per 100ml of volume.
After you have added your culture and the F2 fertilizer you need to close up your vessel. Use the aluminum sheets to form a barrier on the top. It doesn’t have to be tight and will loosen anyway due to pressure in the culture vessel. Just fit it all around the tube and outer area of the vessel to prevent anything from getting inside.
Step 5. You Need Light To Grow Phytoplankton
Phytoplankton is photosynthetic which means it uses light to get nutrients. It requires light to grow and without it, this will not work. The light I use is cheap and works great for me. I have two different lights on one vessel so that I get the best results. One is an LED grow light from Walmart and the other is an LED grow bulb from Lowes. You only need one light and if I were to pick only one then I would skip the bulb. Both links are to Amazon because I couldn’t find them on Walmart and Lowes websites.
Step 6. It Is Time To Culture Phytoplankton
After you complete steps 1 through 5 you will let your phytoplankton culture for about 7 days. If it is a light green color then you should keep it going longer and maybe consider adding another 2ml of F2 for extra fertilization. It should be ready in a week but sometimes two weeks is needed. I like slow growth because I feel the culture is much denser and from my tests, it stores longer in my refrigerator.
Step 7. Harvest Your Phytoplankton
This is the best part. I use these bottles to harvest my phytoplankton so that I can store them in my refrigerator. They are perfect for this because they come with lids and a label you can print if necessary. I just use masking tape to write the date I harvested the phytoplankton and then store them in the refrigerator.
Be sure to shake your harvested bottles of phytoplankton at least once per week. This will keep the phytoplankton from settling and dying.
Step 8. Save A Bottle Of Phytoplankton For New Cultures
Be sure to save a bottle of your own phytoplankton so that you can continue your culture when needed. All you have to do is pour the bottle into your clean culture vessel and start the process over again. I like to start it and split it into several culture vessels which provide me with the optimal amount of phytoplankton for myself and my customers.
Here is a table of F2 dosing requirements. You can double the amount of F2 but this is what I use which grows phytoplankton good for me.
Culture Vessel Volume
F2 Fertilizer Amount
250ml
2.5ml
500ml
5ml
1000ml
10ml
2000ml
20ml
How much F2 fertilizer to use in phytoplankton culture.
Here are some pictures of my own personal set up for culturing phytoplankton.
My phytoplankton harvest sitting on my 180 gallon reef tank.
Conclusion
Harvesting your own phytoplankton is fun and rewarding. Your reef tank will soon be colorful and happy because of your small investment which will save you hundreds of dollars per year all because you can now culture your own phytoplankton.
Affiliate Notice: If you choose to purchase a recommended product and click our links then we will likely earn a commission from your purchase at no extra cost to you.
Today I woke up to a dead fish (Mr. Naso our Naso Tang) and a bacterial bloom in my 180-gallon reef tank and it really caught me off guard. I know the tank is fairly new since I upgraded from my 50-gallon cube to the 180 gallons just two short months ago.
I know that bacterial blooms are common and can happen especially in a new reef tank. There are several ways to combat this and I am going to share the best way to do this.
Before I do, I want to just say that a bacterial bloom happens when there is a need for bacteria to reproduce to clean up organic waste such as food, detritus, dead fish, or invert, etc. The bacteria reproduce much faster and float through the water column and sometimes more surface area is needed to house these bacteria.
Don’t want to keep reading for a solution? Skip the wait and click here to purchase a temporary solution that will get rid of your bacterial bloom right away. Be sure to choose the appropriate UV size for your water volume.
What Is A Bacterial Bloom
A bacterial bloom is a sudden increase of bacterial colonies in the water column of your reef tank or freshwater tank. When bacteria grow so fast it becomes visible to the naked eye causing cloudy water appearance in your reef tank.
A bacterial bloom can occur in an established reef tank or freshwater tank but typically only happens in a newly started aquarium due to the instability of the tank or the build-up of nutrients.
Heterotroph bacteria is usually the bacteria causing the problem as they don’t attach to surfaces as easily as their counterpart and are typically larger. They also reproduce much faster than autotrophic bacteria. Both bacteria can cause cloudy water but the most common are heterotrophs.
What Can Cause A Bacterial Bloom In A Reef Tank
Dead fish, invert and excessive feeding can cause this bacterial bloom to start. This is true for a freshwater and saltwater tank. Sometimes the water is extremely cloudy causing your tank to be an eyesore while other times the tank isn’t too cloudy but you can still see that it is.
If you have a dead or dying fish it is best to get it out as soon as possible. You could have a standby tank to house sick fish or inverts to skip the build-up of bacteria due to fish death but I get that it isn’t always possible to do this.
Who wants to flush a live fish that will likely die? It isn’t easy to do but if you want to skip excessive organic waste in your tank you should consider it. Even a 5-gallon bucket will work with an airstone for oxygen. This is only temporary to make the fish comfortable until it does die if you are uneasy with flushing a live fish.
Bacterial Bloom Not Going Away
I have had a bacterial bloom last over a week but never more than two weeks however I know people who have said their tanks had a bacterial bloom for 3 to 6 weeks.
If you have a bacterial bloom there are several things you MUST do right away. You need to consider any changes, fish deaths, broken equipment, or anything else that could have thrown off the balance and stability in your tank.
Test Your Water – One thing for sure the water testing industry has leveled up over and over. We can test our water to see what our numbers are which can indicate possible issues to come or even diagnose issues. If you have excessive nitrate and phosphate you will need more bacteria to combat this which could cause a bacterial bloom to start.
Check Your Reefing Equipment – If your skimmer fails or your bio pellet reactor isn’t working or getting water flow then this could cause an imbalance making your levels fluctuate which is not good depending on how fast and how much they fluctuate. If your skimmer isn’t working then there will be a build-up of organic waste.
Consider Equipment Upgrades – If you run a skimmer rated for 100 gallons at a low bioload and you add maybe 5 more fish and have to feed heavier for higher energy fish like an Anthias then you may need to upgrade your skimmer and it is likely not doing the job it needs to do good enough. You could also consider upgrading your tank. If your reef tank isn’t large enough to house the livestock you have then your filtration may be working too hard for you.
Check Your Equipment – Your maintenance habits could contribute to a bacterial bloom. If you have filter socks and don’t change them every few days they are a pointless mechanic in your filtration system. I change mine every two days (excessive I know) and I place the used ones in a bucket to clean when it is full. I clean mine once per month using a hose with a pressure nozzle that sprays hard on the filter socks to remove fish poop, food, and other organic waste. Be sure to turn them inside out and spray them well. I also soak them in bleach for a day and then let them dry out before being placed back into the sump.
Time To Stability – One thing most new reef tank owners do is get in a hurry. This is bad in the reefing hobby. Adding fish slowly and letting bacteria build up and take up the surface area you have provided is the best thing for your reef tank. Provide a great place for bacteria to build up by using Brightwell Aquatics Bio Bricks, Bio Balls, and sand in your sump and reef tank.
UV Sterilizer For The Win – A UV sterilizer will stop the bacteria in the water column from multiplying. This is not a permanent fix so be sure to keep good control of your nutrients and filtration.
How Long To Bacterial Blooms Last
A bacterial bloom typically lasts 3 to 5 days but can last up to a few weeks if the bioload is high in your reef tank.
My most recent bacterial bloom lasted just two short days and it was caused by starting a new tank with 9 fish and the filtration from the old tank. It was instantly cycled but still needed to stabilize.
If you experience a bacterial bloom for more than a week then it’s time to check your equipment and be sure that you have all of the proper equipment rated for your reef tank volume. Also, you need to consider any changes in feeding habits or other maintenance habits.
How To Clear A Cloudy Saltwater Tank
Bacterial bloom causing cloudy water to be present in this reef tank. Image Source: Jimbo from Reef2Reef
First, determine why it is cloudy. There are many reasons a saltwater tank could be cloudy. In order to clear it, you must determine the cause.
Here are a few questions to ask yourself:
Did you disturb your sand bed?
Did you just add sand?
Are your powerheads blasting your sand bed?
Did you just add fish?
Did a fish or invert die?
Did a fish, coral, or snail spawn?
If you recently added bacteria to your sand bed or added sand to your saltwater aquarium it is highly likely that this is the cause of your cloudy water.
If you just added sand to your aquarium then this is likely the cause. It could also be the sand bed being blasted by the powerheads moving water. Consider turning the power down some.
If you have recently added fish it is possible that this is a bacterial bloom where the bacteria in your saltwater tank are multiplying fast to make up for the nutrients in your tank.
Consider adding sand if you don’t have sand and more rock to your saltwater tank to add more surface area for the bacteria to grow on.
Do you really have a bacterial bloom? It is possible that you do not. Cloudy water could be from spawning activity in your aquarium. This does cause the water to cloud up and look like a bacterial bloom. If this is the case it will clear up in a day or two. Even if you think you have a bacterial bloom it’s best not to react for a day or two anyway just in case it clears up on its own.
A fish or invert dying could be the cause and you really don’t have much you can do sometimes. Especially when you have a large tank and don’t see the dead specimen.
Can I Add Fish During A Bacterial Bloom
It is not recommended to add fish or inverts during a bacterial bloom. You are only adding to the problem which may cause the bacterial bloom to last longer.
During a bacterial bloom, it is hard for fish to see through the water making them uncomfortable. I know my tangs and a few other fish find a rock and wedge between them due to stress.
To really answer this question consider how you would feel if you couldn’t see in front of you. When you are driving around with high fog it is very uncomfortable and stressful. You cannot wait to get through the fog.
Imagine fish feeling the same way. If you have to add fish due to an order that you are expecting before you had a chance to read this or before your bacterial bloom then check your ammonia levels as well as nitrate to ensure your environment is safe. Make sure this fish has the best chance of survival. Consider setting up a small 20-gallon tank for the new arrivals for the time being.
Will A Bacterial Bloom Kill My Fish
A bacterial bloom will not kill your fish but a lack of oxygen in the water could kill them. If you experience a bacterial bloom it is important to add more aeration to your water. I do this by adding another air stone to the sump providing more oxygen.
Most of the time your skimmer does a great job already but an added air stone can definitely help you sleep better knowing your fish aren’t being deprived of oxygen.
UV Sterilizer For Bacterial Bloom
A UV sterilizer will clear up a bacterial bloom usually within 24 hours if properly installed. A UV sterilizer will stop the reproduction of the bacteria cells allowing the water to clear up. This is not the solution to the problem though. You will still need to find the root cause of your bacterial bloom so that the UV sterilizer will help maintain but your tank will be stable.
What Size UV Sterilizer For Bacterial Bloom
Follow the manufacture’s recommendations on the UV wattage and purchase what you need for your tank otherwise you are wasting your money and the UV sterilizer will not fix your cloudy water.
Best UV Sterilizer For A Bacterial Bloom
I personally use the Coralife Turbo-Twist for my tank. It is not the best UV on the market but for the money and purpose, it is perfectly fine. I see a UV as something to maintain a problem and I want to find the solution so that a UV isn’t necessary just a temporary solution.
Designed to remove unwanted free floating algae, parasites and bacteria
Increased exposure to UV light from twist-flow design
Mounting brackets included for hang on or in-line applications
Indicator light lets you know when the sterilizer is operating
Can be used with freshwater and saltwater aquariums
Bacterial Bloom After Water Change
If you have a cloudy reef tank after a water change then it is highly unlikely that the cloudy water is from a bacterial bloom.
It is possible that out of pure chance the bacterial bloom started after a water change but the likely cause is your substrate or sand being disturbed.
If you are experiencing cloudy water after a water change then allow the sand or substrate to settle and it will settle. Be sure to check your coral and rock for substrate and blow it off with a turkey baster.
How To Prevent A Bacterial Bloom
To help prevent bacterial blooms you can add live copepods which are part of the clean-up crew in your reef tank feeding on detritus and other organic waste. They serve other purposes too but do help as part of a clean-up crew.
Other clean-up crew members such as snails, sand sifting fish, feather dusters, crabs, etc will help prevent these blooms.
Another preventative method is your maintenance routine. I know I have already mentioned this but changing your filter socks, filter floss, and cleaning your skimmer will help prevent this. If everything is working properly and properly maintained the ounce of prevention is going to benefit your reef tank.
Consider upgrading your filter socks to a roller mat. This will keep all the waste buildup from decomposing in your sump preventing an excessive buildup of nutrients that keeps your bacteria from responding so harshly.
Bacterial Bloom In A New Tank And No Fish
If you have a bacterial bloom in a brand new tank without fish then it is likely going to pass in just a few days. This is likely caused by your cycle process and you probably added too much ammonia and caused a spike in nutrients.
Another cause of a cloudy aquarium that is newly set up without fish is the bacteria in a bottle you used. This can cause cloudy water after you pour it in for cycling your aquarium.
Did you disturb your sand? If you just poured the water in or did a water change you can guess it is not a bacterial bloom and it is just the sand floating through your water column.
Conclusion
A bacterial bloom can be somewhat serious but usually not. It is important to figure out what caused the bacterial bloom so that you can prevent it in the future. If you do nothing it will likely go away in just a few days but a UV sterilizer will work, but to keep the balance in your reef aquarium you will need to figure it out and fix the problem so that your fish and coral are happy and healthy.
Clams really are a stunning view in a reef aquarium. I enjoy watching clams open and close and just the sheer beauty they add to the overall reef aquascape.
Saltwater clams are a very popular addition but most people fail to keep even the hardiest of all saltwater clams.
In this article we are going to cover the easiest clams to keep in your reef tank and their care facts.
Are Saltwater Clams Easy/Hard To Keep
Clams can be difficult to keep but if you have a stable and aged reef tank then you will probably have success keeping any clam that catches your eye.
Clams should be added when your tank is mature and it is best to have your reef aquarium seeded with live foods such as tiger pods or tisbe pods. This will add to the success of keeping a live clam in your reef.
Some clams need strong lighting as they are photosynthetic which means they require light for energy. They also feed on live foods and fish waste.
Water Parameters for Saltwater Clams
Clams require stable water parameters and a very healthy reef tank to be happy and thrive. Below are the water parameter requirements for keeping saltwater clams.
Water Parameter
Amount
Salinity
1.023 – 1.025
Alkalinity
9 – 12 dKH
Calcium
380 – 450
pH
8.1 – 8.3
Nitrate
2 – 20 PPM
Strontium
6 – 10 PPM
Iodine
.04 – .08 PPM
Water parameters to keep a healthy saltwater clam.
Salinity: 1.023 – 1.025
Alkalinity: 9 to 12 dKH
Calcium: 380 to 450
pH: 8.1 to 8.3
Nitrate: 2 to 20 PPM
Strontium: 6 to 10 PPM
Iodine: 0.04 to 0.08 PPM
Stable Water Parameters
The best way to keep the water quality stable is to use a high-quality dosing pump (Amazon Link) to keep your levels stable and through water changes. Stability is the key to a successful reef tank so it would make sense to keep your water parameters as stable as possible. Some nitrate is required or your clam will starve.
If you find yourself out of range in any of these parameters don’t stress. I often find myself out of these numbers especially alkalinity and calcium which I have to chase a little as growth and uptake demand increases. Just bring your levels up slowly over a period of days or even weeks and you should be good.
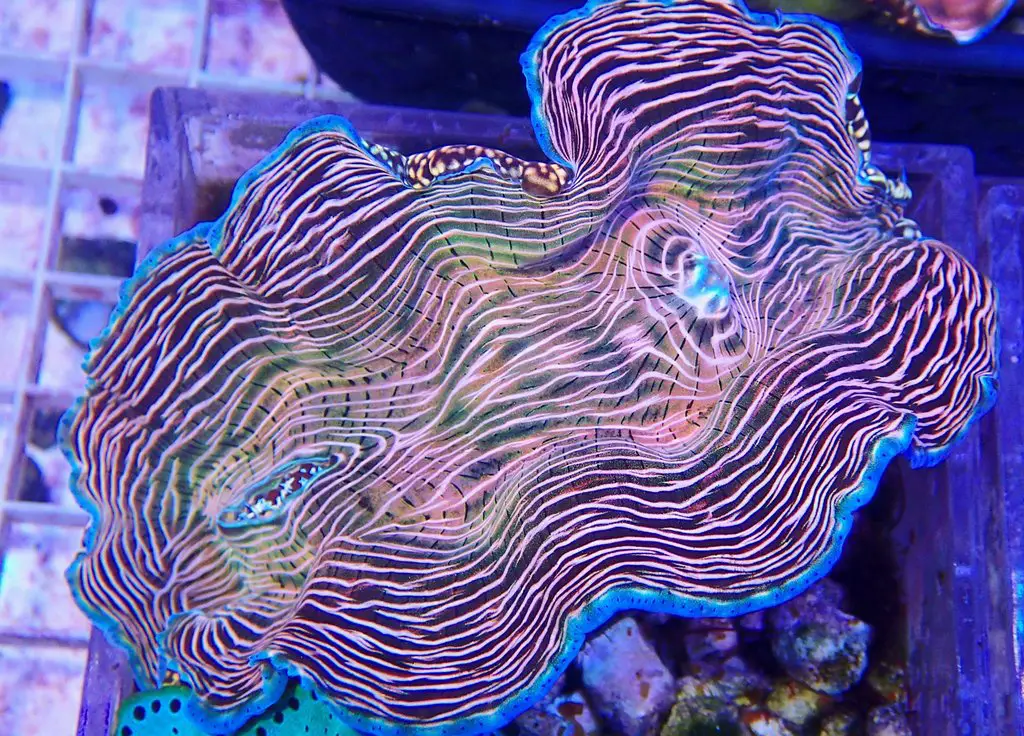
Easiest Clams To Keep
There are always hard to keep coral, fish or inverts but if you keep stable water parameters this shouldn’t be an issue. Some livestock are marked as expert due to the fact they require stability and extra handling. These are probably the best to stay away from.
Here is a list of the best clams for a reef tank:
Derasa Clam
Derasa clam under beautiful blue reef lights really showing off the colors nicely. Image Source: No Coast Aquatics
Derasa clams are known as the hardiest and largest clams in a reef tank. These clams require less lighting and aren’t as picky about water quality.
Derasa clams grow fast so be sure to have ample space available for adequate growth. A great par range is 250 to 450 but be on the higher side to make sure that your Derasa clam is happy.
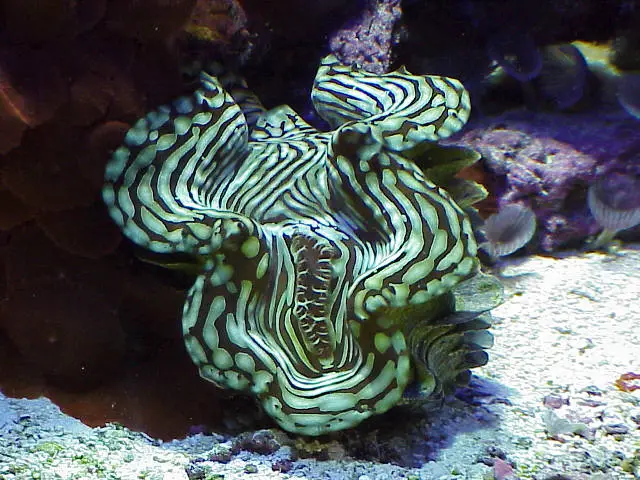
Squamosa Clam
Squamosa Clam in a reef tank showing off green coloring. Image Source: 180 Reef
Squamosa clams require less lighting and flow but the better you can provide for them the better they are. Lighting is important for all saltwater clams and that means even the hardiest and less picky of the species could use a good light show above.
A par range from 200 to 300 is ok but if you can up that to about 450 they would greatly appreciate it.
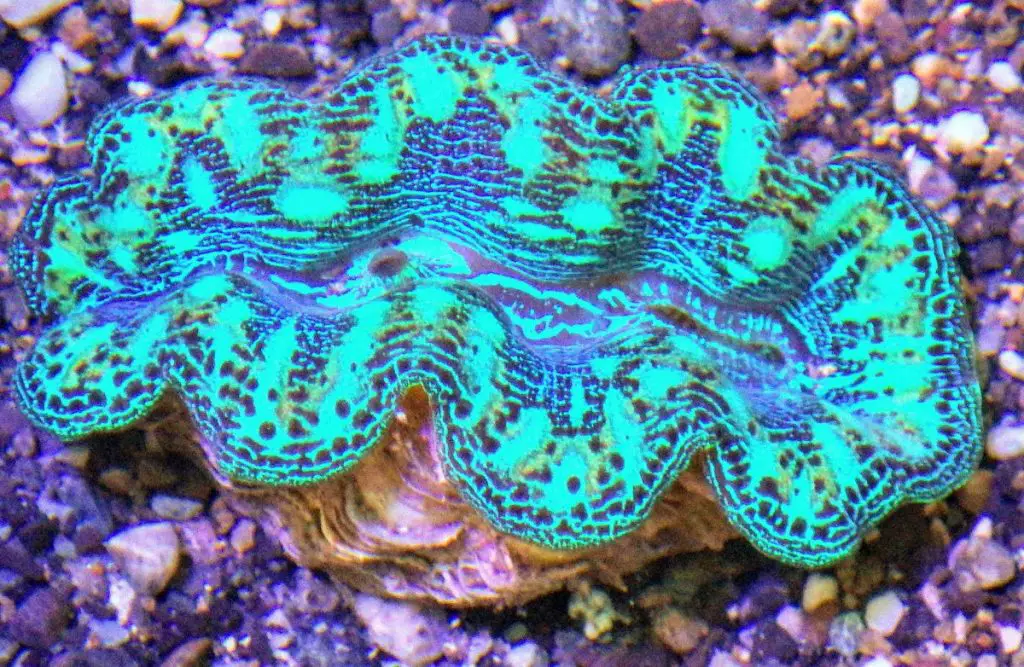
Crocea Clam
Crocea clam in a reef tank featuring bright electric green coloring. Image Source: Reef2Reef
Crocea clams are the smaller of the few and do not grow more than 6 inches but they are a beautiful specimen that will add a beautiful splash of color and movement to your reef aquarium.
Crocea clams could benefit from high lighting in the 250 to 450 range and even higher if you have the ability. Mine enjoy a par of 600 but be sure to gradually increase the par over time.
Crocea Clam Care
Crocea clams aren’t too picky with their care but you should provide medium flow and intense lighting if possible. They are very easy to care for and do not show itself as unhappy when they aren’t receiving enough light. The more the better.
Feeding Crocea Clams
I feed Reefroids for successful growth and nutritional needs. Crocea clams are filter feeders exporting nutrients from the water in your reef aquarium.
Maxima Clam
Red Sea Maxima clam with blue colors halfway open. Image Source: Reefbuilders.com
The Maxima clam is the most popular saltwater clam of its type. They are found all over the world in shallow areas of the wild ocean and aquariums but mostly aquariums whose owners have a more professional experience.
Maxima Clam Care
Maxima clams require a ton of random flow and are not so hardy compared to their relatives. To make this clam happy be sure to have an established aquarium for at least 1-year-old and lots of live plankton and stable parameters.
Feeding Maxima Clams
Maxima clams feed by pulling nutrients from the water in your reef aquarium. This is why they need strong flow and excellent lighting to assist with energy production.
I like Reefroids for feeding all of my coral and other filter feeders. This food contains all of the nutrients they need to survive and flourish. This product helps with amazing growth for coral and clams.
Easiest Clams For A Reef Tank
Derasa clams are among the easiest to keep happy as they are not very picky but that doesn’t mean you should just add one to add one.
I recommend that you at least age your aquarium 6 months to 1 year before adding a Derasa clam to your reef tank. Yes they are probably the easiest clam for a reef tank and easiest to keep alive but don’t underestimate their needs to survive.
Conclusion
Clams are a great addition to any reef aquarium. Be sure to have adequate and intense lighting and flow for these reef inhabitants. To keep a clam you need to have an established aquarium with lots of zooplankton for feeding.
Blue whales are endangered due to whaling which is the hunting and killing of whales. Whales are extremely fast and extremely heavy. They are the heaviest animal on the planet. Whalers have come up with new ways to catch and kill whales illegally. Thousands of whales are caught each year.
Why Are Whales Hunted
Whales are hunted for the oil to use for candles, soap, margarine, and lamps. They used other parts for meat and fertilizer. Whale oil, blubber, and cartilage are also used in pharmaceuticals and health supplements.
The International Whaling Commission made it illegal to hunt blue whales in 1966 because of the whales being endangered but that doesn’t stop illegal poaching of whales.
There are still several countries who do not have a ban on commercial whaling and they are:
Japan
Norway
Iceland
All three of these countries have their reasoning for not banning the killing of whales but are they good reasons?
How Many Blue Whales Are Left In The World
There are about 25,000 blue whales left in the world and they continue to be on the endangered species list under the Endangered Species Act. About 2,000 whales live off the coast of California and 10,000 to 25,000 everywhere else.
Are Blue Whales Going Extinct
Blue whales could make a comeback and their population recovers about 7% each year since the ban on whaling in 1966.
Other Threats to Blue Whales
Whaling is illegal today, but blue whales face many other threats and they are:
Entanglement – Whales are often caught in fishing line.
Food Shortage – There is considerably less amount of food for whales.
Climate Change – Climate changes cause many issues for whales.
Our way of life is killing our oceans causing coral reefs to die off, wild ocean animals to die of and so much more.
Blue Whale Population 2020
There are between 10,000 and 25,000 blue whales left in the world’s oceans today. You can help this number increase by donating a small amount to the Ocean Conservancy.
Conclusion
Whales are important to this world. They are killed even illegally and still some countries have not banned the killing of whales but they really should. What are your thoughts on whaling and the number of whales left in the world?
PetsOfWater.com is a participant in the Amazon Services LLC Associates Program, an affiliate advertising program designed to provide a means for sites to earn advertising fees by advertising and linking to Amazon.com.